Routerino: Simplify React Routing for SEO Success
Table of Contents
Are you a React developer looking for a way to simplify your routing and make your website more SEO-friendly. Then look no further than Routerino!
Routerino is a powerful and versatile React Router package that can help you create high-quality, SEO-friendly websites with ease.
It provides a simple structure for creating routes, and it can generate a sitemap for your website in a single line command. How cool is that?
You not only get the benefit from not having to manually create a router component each time you start a new project, but with Routerino, your work gets so much easier.
It’s now just ease that Routerino provides, it’s the highest quality router component you can find. Your website’s pages are routed in such a way that each of them can rank high in the search engine. You do not even have to do much.
Here are the top benefits of using Routerino:

- SEO Friendly
Routerino is specifically designed to have a substantial impact on your website's search engine optimization. By optimizing each page for search engines, your website is more likely to achieve higher rankings on search engine results pages (SERPs).
- Sitemaps
Routerino goes beyond just routing by easily generating a sitemap for your website with a single line of code.
A sitemap is a file that comprehensively lists all the pages on your website along with their relationships.
This valuable resource aids search engines in efficiently crawling and indexing your website, contributing to improved performance in search engine rankings.
Later in this guide, we'll explore in more detail how Routerino facilitates the generation of sitemaps and why they play a crucial role in enhancing your website's visibility on search engines.
- User-Friendly
One of the standout characteristics of Routerino is its user-friendly nature. It simplifies the router component, making it easy to integrate into your projects. Additionally, Routerino allows you to generate routes from your existing page hierarchy, further streamlining the process.
- Flexibility
Whether you're working on a small project or a complex web application, Routerino adapts to your needs. Its flexible routing capabilities empower developers to define routes for various components and pages effortlessly. This adaptability is particularly advantageous in projects where scalability is a concern.
Prerequisite
Before we dive into the capabilities of Routerino, it's very crucial to ensure that your development environment isset up properly.
This begins with verifying whether you have the latest Node.js version installed on your computer.
If you haven't installed Node.js yet or are uncertain about your current version, fear not – we've got you covered.
Here is the detailed step-by-step guide:
Checking Your Node.js Version
- Open Your Terminal/Command Prompt:
o On Windows, you can use Command Prompt or PowerShell.
o On macOS or Linux, you can use Terminal.
- Enter the Following Command:
sh
   node -v
This command will display the currently installed Node.js version.
If you see a version number, you're good to go.
However, if it returns an error or if the version is outdated, follow the steps below to install or update Node.js.
Installing or Updating Node.js: A Comprehensive Guide
To ensure you have the latest version of Node.js, you can follow these steps:
- Access the Installation Guide:
Visit Kinsta's comprehensive guide to install Node.js for a detailed walkthrough.

This guide covers the installation process for various operating systems, including Windows, macOS, and Linux.
It provides clear instructions and additional insights to make the installation process seamless.
- Choose the Right Method for Your System:
o The guide supports different operating systems, ensuring that you choose the appropriate method for your computer.
o Whether you're on Windows and using the Node.js installer or leveraging package managers like Homebrew on macOS, the guide has you covered.
- Verify Your Installation: After following the steps in the guide, it's crucial to verify that Node.js and npm (Node Package Manager) are successfully installed. You can do this by running the following commands in your terminal:
sh
node -v
sh
npm -v
Ensure that both commands return version numbers without errors.
By taking the time to confirm and, if necessary, update your Node.js installation, you set the stage for a smooth and hassle-free integration of Routerino into your development workflow.
Now that you have set up NPM, you are ready to use Routerino in your project!
Creating a Vite Project

With NPM:
Open your terminal and run the following command to create a new Vite project using NPM:
sh
$ npx create-vite@latest my-react-app --template react
This command initializes a Vite project named my-react-app with the React template. I
f you're using npm version 7 or higher, include an extra double-dash, as shown below:
sh
$ npm create vite@latest my-react-app -- --template react
With Yarn:
sh
$ yarn create vite my-react-app --template react
With PNPM:
sh
$ pnpm create vite my-react-app --template react
Navigate to Your Project Directory
Once the project creation process is complete, navigate to your newly created project directory:
sh
$ cd my-react-app
Adjust the command according to your chosen project name.
Note: For Additional Vite Templates
Refer to the Vite's documentation
for more details on supported templates, including vanilla, vanilla-ts, vue, vue-ts, react, and others. You can explore these options based on your project requirements.
Let's use Routeirno now!
Step 1 : Install Routerino with NPM
Run the following command to install Routerino using npm:
sh
$ npm install routerino
This command fetches the latest version of Routerino from the npm registry and installs it as a dependency in your project.
After the installation process is complete, it's essential to verify that Routerino has been successfully integrated into your project.
You can do this by checking your project's package.json file.
Open the file and confirm that "routerino" appears under the "dependencies" section.
Package.json
json
{
  "name": "my-react-app",
  "version": "1.0.0",
  "dependencies": {
    "react": "^17.0.2",
    "routerino": "^1.0.3"
  }
}
The version number may vary based on the latest release of Routerino.
Step 2: Create the routes.jsx file
The
routes.jsx file is an important part of Routerino because it allows you to define all of the routes for your website in one place. This makes it easy to add, remove, or modify routes as needed. Additionally, the routes.jsx file provides a way to define the title, description, and tags for each route. This information is used for SEO purposes, so it is important to make sure that it is accurate and up-to-date.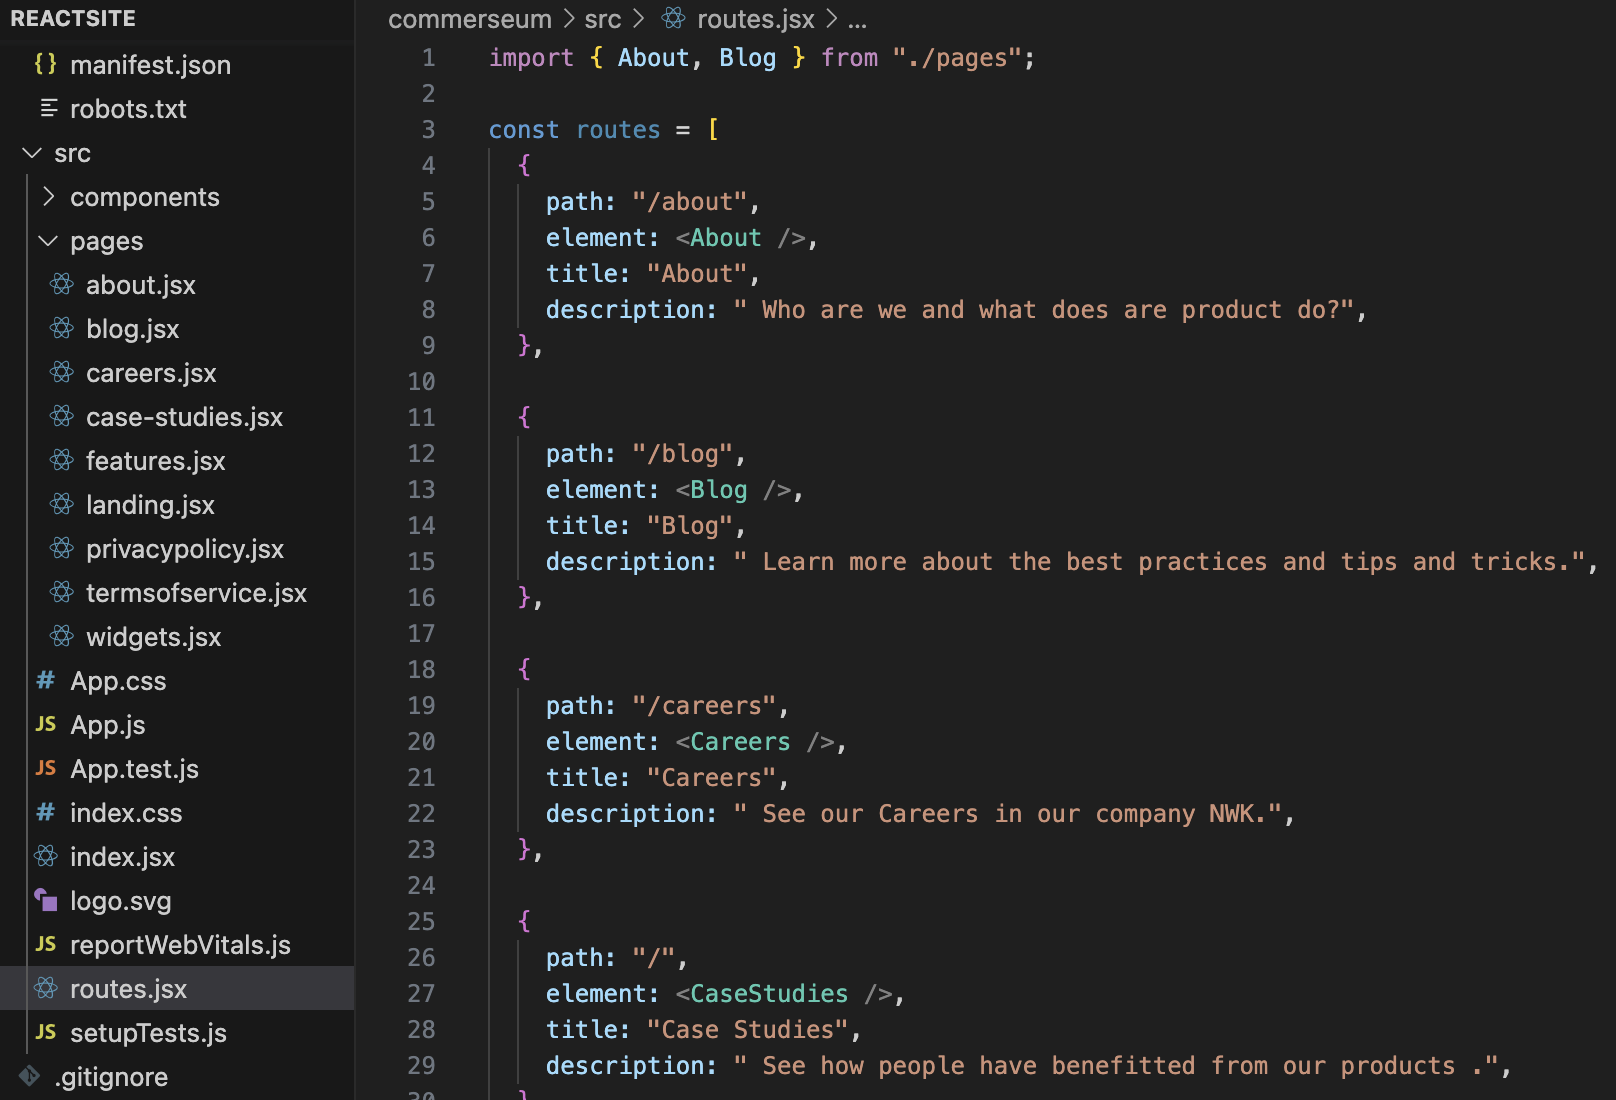
Here is what the
routes.jsx file should be :jsx
import { About, Blog } from "./pages";
const routes = [
{
path: "/about",
element:
title: "About",
description: " Who are we and what does are product do?",
tags: [{ property: "og:type", content: "article" }],
},
{
path: "/blog",
element:
title: "Blog",
description: " Learn more about the best practices and tips and tricks.",
tags: [{ property: "og:type", content: "article" }],
},
];
This routes.jsx file defines two routes: /about and /blog. The /about route renders the About component and displays the title "About Us" and the description "Learn more about our company and our mission." The /blog route renders the Blog component and displays the title "Blog" and the description "Read our latest blog posts on all things web development."
Let us see what each ccomponent does in detail:
Path
The path is the URL path for the route. It is important to use consistent naming conventions for your routes. This will make it easier to read and maintain your code. Additionally, make sure that each route has a unique path. If two routes have the same path, Routerino will not be able to determine which route to render.
Element
The element is the React component to render for the route. This can be a simple component, such as a text or image component, or it can be a more complex component, such as a blog post or product page component.
Title
The title is the title of the route, which will be displayed in the browser tab. It is important to choose a descriptive title for each route. This will help users to understand what each page is about and to find the pages that they are looking for.
Description
The description is a brief description of the route, which will be used for SEO purposes. It is important to write a descriptive and informative description for each route. This will help search engines to understand what each page is about and to rank the pages accordingly.
Tags
Tags are additional meta tags for the route. These tags can be used to provide additional information about the page to search engines. For example, you could use tags to specify the type of content on the page (e.g., article, blog post, product page) or the topics that the page covers.
We will later see what each of these components contribute to the SEO.
Step 3: Implement Routerino in your app
Now that you've configured Routerino and set up your routes, it's time to seamlessly integrate Routerino into your main React application. This step involves importing Routerino, passing the routes array as a prop, and customizing the title postfix for your site if you want to.
Open Your Main Application File
Navigate to your main application file, typically named App.js or index.js. This is where your main React component is defined.
Import Routerino and Configure Your App Component
In your main application file, import React and Routerino. Then, configure your App component by passing the routes array as a prop to Routerino. Additionally, you can customize the title postfix for your site.
jsx
import React from "react";
import Routerino from "routerino";

const App = ({ routes }) => (


);

export default App;
Understand the Configuration :
routes Prop
Ensure that you pass the routes array you defined earlier as a prop to the Routerino component. This array contains the configuration of your routes.
titlePostfix Prop
Customize the titlePostfix prop according to your preferences. This allows you to append a suffix to the title of your website. In the example, " | Hello 2023" is appended to the default title.
Step 4: Confirming Integration
With this setup, Routerino seamlessly takes control of handling navigation based on the configured routes. The
Routerino component will render the appropriate component based on the current route, providing a smooth and intuitive user experience.Test Your Website
Run your React application and navigate through the defined routes. Ensure that Routerino correctly handles the routing, rendering the appropriate components for each route.
You are now ready to go!
Sitemap

A sitemap is a file that lists all of the pages on your website and their relationships to each other. Sitemaps help search engines to crawl and index your website more effectively, which can lead to improved search engine rankings.
Routerino makes it easy to generate a sitemap for your website with its built-in build-sitemap command. This command takes a few arguments to customize the sitemap generation process:
• routeFilePath: The path to the file containing your routes. Routerino can read routes defined directly in its props or stored in an array named routes/Routes.
• hostname: The domain to use as the base for the URLs in the sitemap. This ensures that your sitemap accurately reflects your website's structure.
• outputPath: The path where Routerino should write the new sitemap XML file.
Here is an example of how to use the build-sitemap command to generate a sitemap:
sh
build-sitemap routeFilePath=src/routes.jsx hostname=https://example.com outputPath=dist/sitemap.xml
This command will generate a sitemap file called sitemap.xml in the dist directory of your project.
You can then submit this sitemap file to Google Search Console to help Google crawl and index your website more effectively.
Why is Sitemap important and How does it help?
Improved Crawling
When search engines crawl your website, they follow links from one page to another. A sitemap can help search engines to discover all of the pages on your website, even those that are not linked to from other pages. This is because a sitemap lists all of the pages on your website in a single file.
Enhanced Visibility
Sitemaps can help search engines to better understand the structure of your website and the content on each page. This can lead to improved visibility in search results. For example, if you have a new blog post, you can submit a sitemap to Google Search Console to let Google know about the new page. Google will then crawl the page and index it, making it available to searchers.
Content Prioritization
Sitemaps can also be used to prioritize certain pages over others. For example, if you have a landing page that is important to your business, you can list it first in your sitemap. This will signal to search engines that this page is important and should be crawled and indexed first.
Dynamic Content Inclusion
If your website includes dynamic content or pages generated through client-side routing, a sitemap is essential. This is because search engines may not be able to discover all of the pages on your website if they are not explicitly listed in a sitemap.
Why should you use Routerino?
The answer is for SEO
The way you organize your routes plays a crucial role in boosting your site's SEO.
Routerino makes SEO easy by providing a number of features that help you optimize your routes for search engines.
Here are just a few examples:
Support for Meta Descriptions
Crafting compelling meta descriptions is made effortless with Routerino. Meta descriptions are short snippets of text that appear in search engine results pages (SERPs) below your page title. They are a great way to give users a preview of what your page is about and convince them to click on it.
Support for Canonical Tags
Routerino empowers you to define canonical tags for each route. Canonical tags tell search engines which version of a page is the primary one. This helps to prevent duplicate content issues and ensures that the correct version of your page is indexed.
Support for Hreflang Tags
Routerino allows you to define hreflang tags for each of your routes. Hreflang tags tell search engines which language version of a page is targeted at which audience. This helps to improve the user experience for international users.
Element
The element of a Routerino route is the React component that will be rendered for that route. It is important to optimize your React components for SEO. This means using proper heading tags, image alt text, and other SEO best practices.
For example, if you have a Blog component, make sure to use heading tags to structure your content and image alt text to describe your images. This will help search engines to understand your content and index it accordingly.
Here are some tips for optimizing your React components for SEO:
• Use heading tags (h1, h2, h3, etc.) to structure your content.
• Use image alt text to describe your images.
• Use internal links to link to other relevant pages on your website.
• Use descriptive meta descriptions for each page.
Title
The title of a Routerino route is the text that will appear in the browser tab and in SERPs. It is important to choose descriptive titles that are rich in keywords. This will help users to understand what your page is about and encourage them to click on it.
For example, the title "How to Write a Great Blog Post" is more descriptive and keyword-rich than the title "Blog Post". The first title is more likely to be clicked on by users in SERPs.
Here are some tips for writing SEO-friendly titles:
• Keep them short and to the point.
• Use relevant keywords that accurately reflect the content of the page.
• Make sure they are unique and attention-grabbing.
Description
The description of a Routerino route is the short snippet of text that appears in SERPs below the page title. It is important to write descriptive descriptions that are rich in keywords. This will give users a preview of what your page is about and convince them to click on it.
For example, the description "Learn how to write a great blog post that will engage your readers and boost your website traffic." is more descriptive and keyword-rich than the description "This blog post is about writing."
The first description is more likely to convince users to click on the page.
Here are some tips for writing SEO-friendly descriptions:
• Keep them under 160 characters.
• Use relevant keywords that accurately reflect the content of the page.
• Make sure they are informative and engaging.
It is best practice to read and see for yourself if you would click the link if you were the end user. Try to make it unique and catchy.
Tags
Tags are additional meta tags that can be added to Routerino routes.
They can be used to specify the type of content on the page, the topics that the page covers, or other relevant information. Tags can help search engines to better understand your content and index it accordingly.
These tags influence how your content is displayed on platforms like Facebook, Twitter, and LinkedIn, impacting user engagement and click-through rates. This not only enhances the presentation of your content on social media but also contributes positively to your website's overall SEO performance by broadening its online presence.
Here are some tips for using tags effectively:
• Use relevant and descriptive tags.
• Avoid using too many tags.
• Use a consistent tagging structure.
By following these tips, you can use Routerino to create SEO-friendly routes that will help you improve your website's visibility in search engine results pages.
Conclusion
Routerino is a powerful and versatile tool for managing routes and generating sitemaps in React applications. It offers a number of features that make it easy to create SEO-friendly routes and sitemaps, including:
- Seamless integration with the build process
- Support for both inline and external route definitions
- Customizable sitemap generation
- Lightweight package
So, if you are looking for a way to improve the SEO of your website, Routerino is a simplest and most effective way to create SEO-friendly routes and sitemaps.
Moreover, Routerino is also well-maintained and has an active community. This means that you can be confident that you will be able to get help if you need it. You can contact the support agent directly from the NWK support page.
If you want to improve the SEO of your website, Routerino is your best friend. Try it now!